設置完畢,captive portal後,當使用者要連線網路時,會被轉向到一個登入頁面,如圖
這個頁面當然也很好用,但有幾個問題,它是英文的,它也沒有自己專屬的LOGO,如果你是公司要用的話,那麼如何客製這個頁面呢?
只要到services/Captive Portal/Configuration裡,
找到Html Page Contents這一部份的設定即可,如圖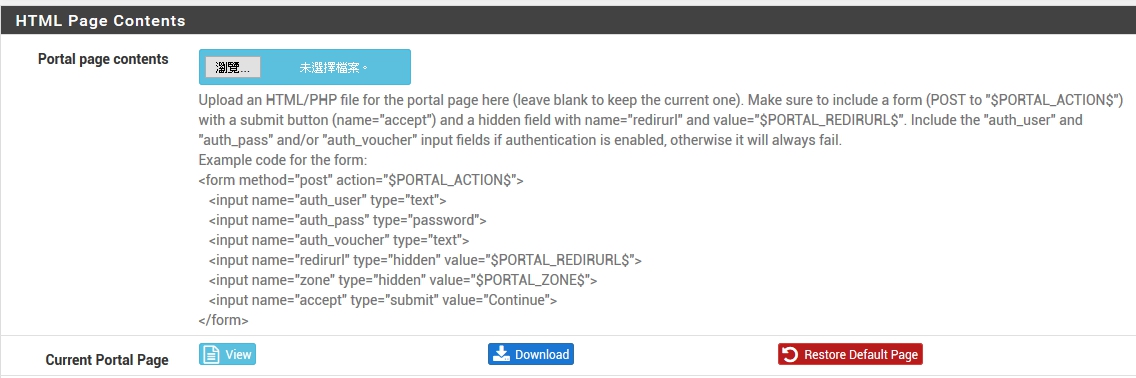
這裡有明確的說明,要求你表單要傳送的變數名稱等,所以在客製網頁時,這些部份必須遵守它的規定!!
以下分享我的頁面,
只是做DEMO,所以未太要求美工,不要挑剔我這個部份!!
如圖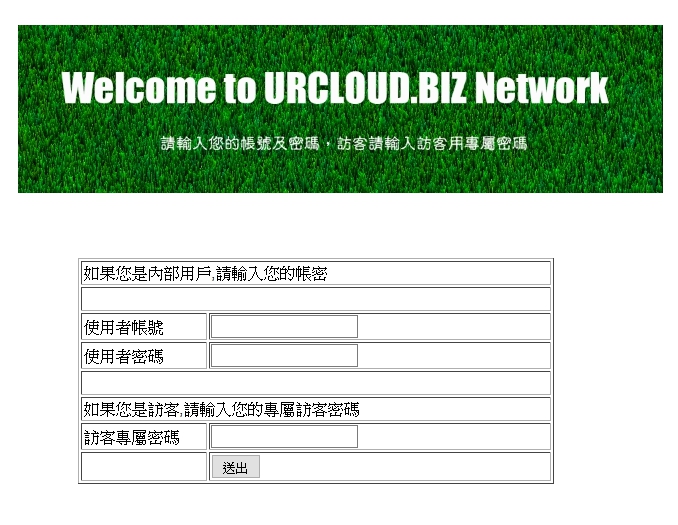
原始碼如下:
<title>Welcome To Urcloud.biz Network</title>
<style type=”text/css”>
#tablespace {
position: relative;
height: 50%;
width: 50%;
left: 240px;
top: 125px;
right: auto;
bottom: auto;
}
#headline {
position: relative;
height: auto;
width: auto;
left: 180px;
top: 60px;
right: auto;
}
</style>
</head>
<body>
<img src=”captiveportal-title.jpg” alt=”” name=”headline” id=”headline” />
<div id=”tablespace”>
<form method=”post” action=”$PORTAL_ACTION$”>
<table width=”50%” border=”1″ cellpadding=”1″>
<tr>
<td colspan=”2″>如果您是內部用戶,請輸入您的帳密</td>
</tr>
<tr>
<td colspan=”2″> </td>
</tr>
<tr>
<td width=”27%”>使用者帳號</td>
<td width=”73%”><input name=”auth_user” type=”text”></td>
</tr>
<tr>
<td>使用者密碼</td>
<td><input name=”auth_pass” type=”password”></td>
</tr>
<tr>
<td colspan=”2″> </td>
</tr>
<tr>
<td colspan=”2″>如果您是訪客,請輸入您的專屬訪客密碼</td>
</tr>
<tr>
<td>訪客專屬密碼</td>
<td><input name=”auth_voucher” type=”text”></td>
</tr>
<tr>
<td> </td>
<td><input name=”accept” type=”submit” value=”送出” /></td>
</tr>
</table>
<input name=”redirurl” type=”hidden” value=”$PORTAL_REDIRURL$”>
<input name=”zone” type=”hidden” value=”$PORTAL_ZONE$”>
</form>
</div>
</body>
</html>
比較常會疑惑的問題,應該是如果網頁中有圖檔的話,如何上傳到PFSENSE呢?
關於這個問題,首先你必須先使用services/captive portal/file manager,將你的圖檔上傳,如圖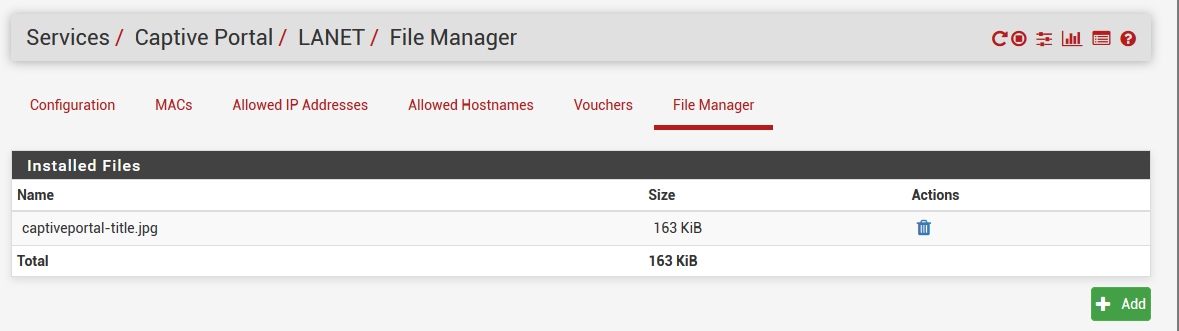
上傳後,請注意你的圖檔檔名會被加上captiveportal-你的原檔名.jpg,
所以你的網頁上,也要把IMAGE的超連結指向這個檔名即可,如我的範例, <img src=”captiveportal-title.jpg” alt=”” name=”headline” id=”headline” />
以上即是大致流程,如有問題,請加以指教!!